Buttery Sweet Potato Biscuits: My Golden Recipe
Jump to Recipe
Picture taking a tray of golden, flaky biscuits out of the oven. The smell of butter and sweet potatoes is in the air. Every bite is soft inside with a perfectly crispy bottom. These biscuits are perfect for breakfast sandwiches or for serving at a holiday meal. They are versatile and truly memorable.
What makes this recipe unique? It’s about finding a mix of tradition and practicality. I’ve included some modern touches, such as cast iron baking and careful dough folding, to help you achieve restaurant-quality results at home. Let’s get started and make something great together.

Reasons to Try Sweet Potato Biscuits
Each bite of these biscuits shares a tale of tradition and taste. Originating from Southern kitchens, they were created out of need, using sweet potatoes as a cost-effective substitute for dairy. This made them not only affordable but also gave them a unique, earthy sweetness that is difficult to replicate.
These provide a nutritional advantage over traditional biscuits. Sweet potatoes are full of vitamins and fibre, which makes them a better option for your health. The bright orange colour brings life to any meal, making even the simplest dish look appealing.
I really enjoy the wonderful mix of flavours. They have a gentle sweetness and a savoury flavour, making them suitable for any event. Enjoy them with breakfast gravy, or serve them next to holiday gammon for a festive flair. My grandmother always prepared them for Thanksgiving, and the smell still brings back fond memories.
A notable aspect is how well they hold moisture. The vegetable base makes them soft and light, even days after baking. Whether you’re just starting with biscuit recipes or have been baking for a while, these are a must-try because of their rich history, natural flavours, and versatility for any meal.
Gathering Your Ingredients
To make perfect biscuits, you need to begin with the right ingredients. Every part is important for making that golden, flaky texture we all enjoy. Every detail is important, from the kind of flour to the temperature of the butter.
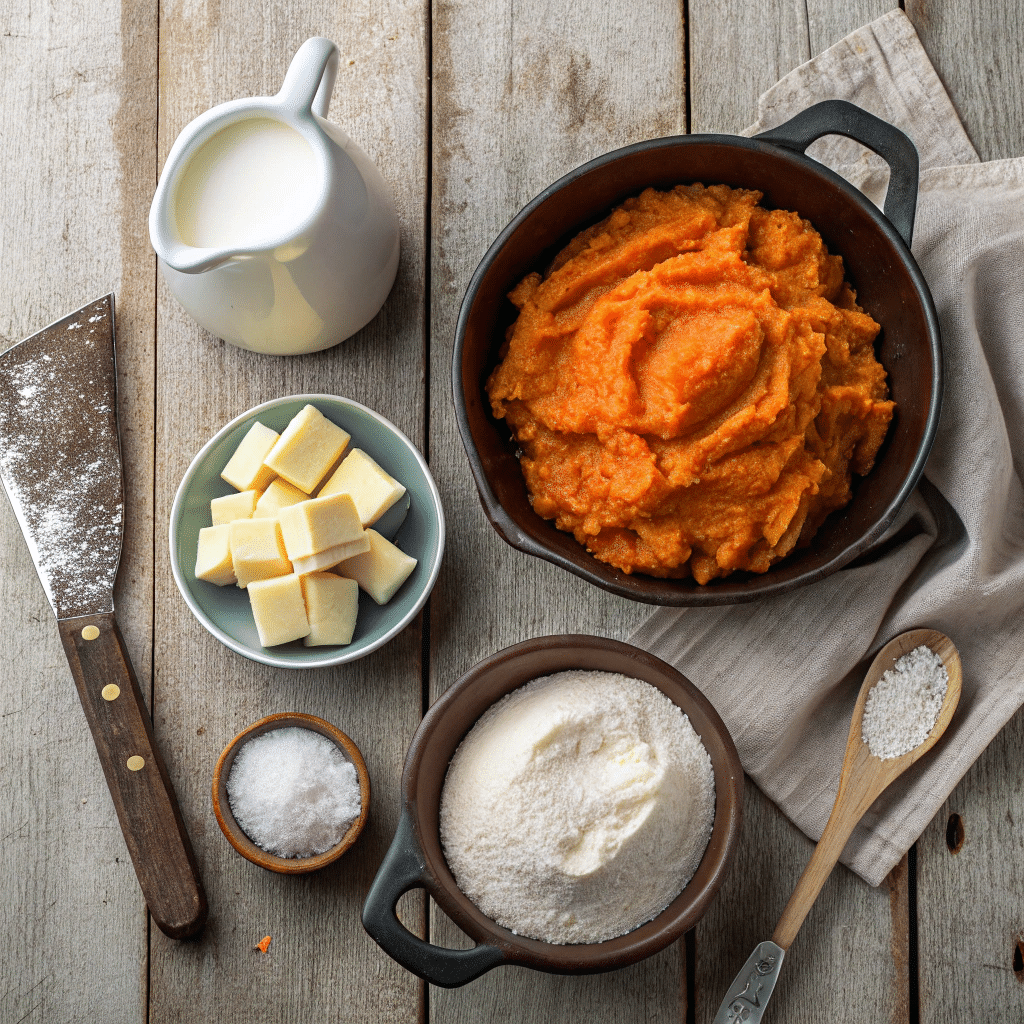
Essential Ingredients for Perfect Biscuits
Here’s what you’ll need to make these biscuits shine:
- Flour: I prefer Gold Medal for its consistent quality, but any all-purpose flour works.
- Butter: Cold butter is key. It creates those flaky layers we crave.
- Baking Powder: Freshness matters. Test it by mixing a teaspoon with water—if it fizzes, it’s good to go.
- Sugar: Just a touch to balance the flavours.
- Milk: Whole milk adds richness, but you can use alternatives like almond or oat milk.
Tips for Choosing the Best Sweet Potatoes
If you’re using fresh sweet potatoes, look for ones that are firm and vibrant in colour. Here’s how to prepare them:
- Roasting: Enhances the natural sweetness and depth of flavor.
- Boiling: Quick and easy, but may dilute the flavor slightly.
- Microwaving: A time-saving option for busy bakers.
For canned purée, you can adjust the moisture by draining any extra liquid. My grandmother always roasted hers, and the taste difference makes it worth the extra effort.
Making the Sweet Potato Purée
The key to this recipe is making the perfect purée. It’s the place where taste and feel blend perfectly. I will share my favourite ways to make sweet potato purée, and each one has its own special appeal.
Roasting is my favourite way to bring out strong flavours. Set your oven to 400°F. Prick the potatoes with a fork, wrap them in foil, and bake for 45 to 60 minutes. When it’s tender, scoop out the flesh and blend it until it’s smooth. The outcome is rich and smooth.
On busy mornings, using the microwave is really helpful. Make small holes in the potatoes, put them on a plate that can go in the microwave, and cook for 5 to 8 minutes. Allow them to cool, then mash with a fork or blend them. It’s fast but still tasty.
Do you have any baked potatoes left over? They are great for making purée. Just heat it up, scoop it out, and mix it together. This approach saves time and cuts down on waste.
The texture is important. To achieve a silky smooth purée, use an immersion blender. If you like rustic pieces, use a fork to mash them. I enjoy noticing bits of potatoes in my dough—it gives it a unique touch.
Keep your purée in a sealed container for up to a week. If the dough is too wet, you can either drain some of the extra liquid or mix in a little flour to make it just right. Some preparation can really help you get the right consistency.
Combining the Ingredients
Combining the dough is the start of something special. This step turns basic ingredients into a light, flaky pastry. It’s important to find a balance between being precise and gentle, making sure each bite is soft and has layers.
Mixing Dry and Wet Ingredients
Begin by mixing the dry ingredients—flour, baking powder, and a little sugar. This makes sure the leavening agent is spread out evenly. Next, add cold butter to the mixture and cut it in. Imagine making small bursts of taste. The butter should be in small pieces, about the size of Cheerios, for the best flakiness.
Next, mix in the wet ingredients. Add the milk and sweet potato purée, stirring until the dough forms. Mixing too much can make biscuits tough, so stop when the mixture feels crumbly yet holds together.
Working with the Dough for Flaky Layers
When the dough is ready, it’s time to make those desired layers. Take the dough and press it gently into a rectangle. Then, fold it like a letter and do this again. This method creates flaky layers without stressing the gluten too much.
I usually mix by hand, but using a food processor can be quicker. First, pulse the butter and flour together, then add the wet ingredients. No matter which method you pick, make sure to keep the dough cold. Warm kitchens can make the butter soft, so be sure to work quickly or cool the dough if necessary.
Some common mistakes are mixing too much and using butter that is too warm. Both can result in biscuits that are dense and tough. Keep in mind that the dough will feel crumbly at the beginning—this means you’re doing it correctly.
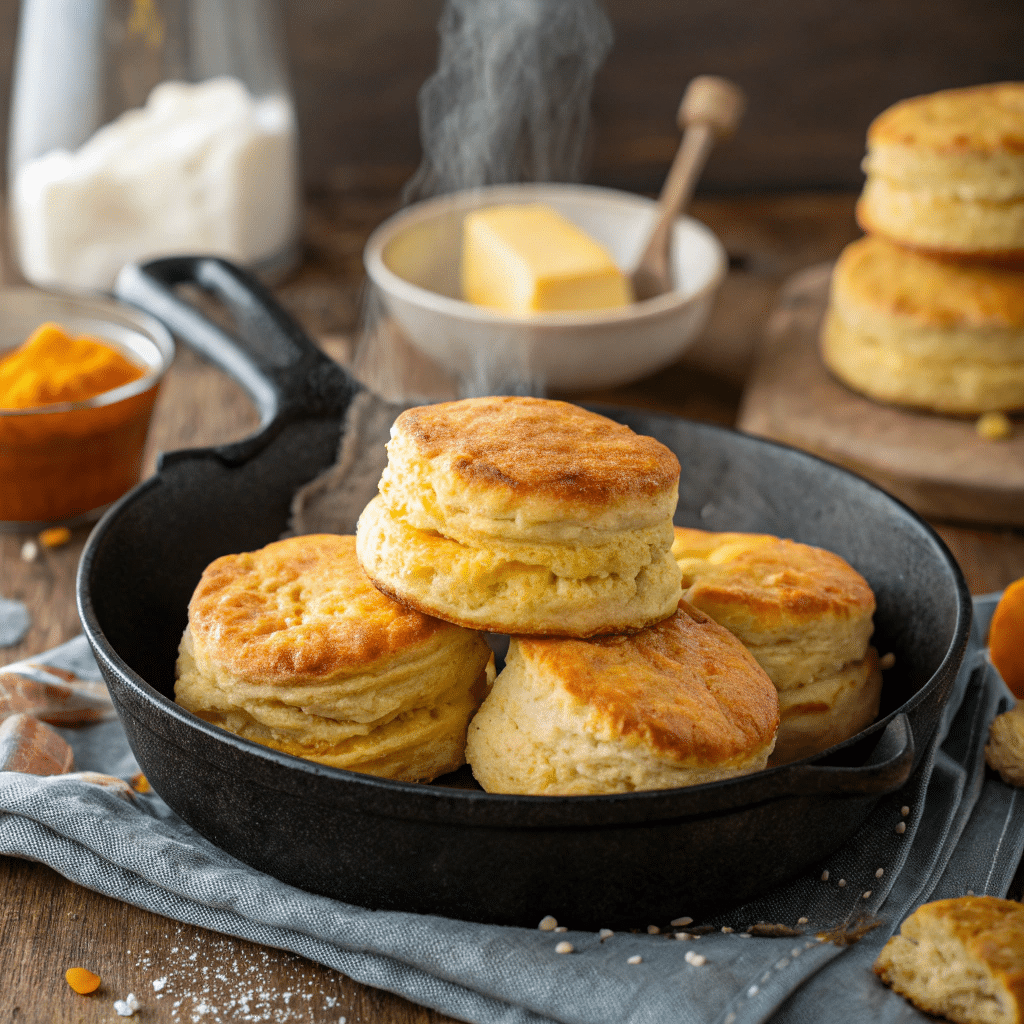
Cutting and Shaping the Cookies
Shaping the dough combines creativity with careful attention to detail. This step turns your mixture into golden, flaky pieces that are just right. Begin by sprinkling a little flour on your work surface to avoid sticking. Roll the dough to about ½ inch thick, then use a 1¾-inch metal cutter to cut out the biscuits. Metal cutters are my favourite because they are sharp and make clean edges. Glass jars, on the other hand, can squish the dough.
Arrange the rounds closely in a cast-iron skillet. This setup helps the biscuits rise high and become fluffy. When using a baking sheet, place them a little apart for uniform browning. The thickness of your dough is important—if it’s too thin, they will bake too fast; if it’s too thick, they may not cook all the way through.
Make sure to use the scraps! Press them together softly, turn the dough once, and cut it again. Be gentle with the dough, as overworking it can make it tough. My first try was uneven, but with practice, I can improve. For holidays, consider using fun shapes like stars or hearts. They add a festive touch that will definitely impress.
When using cast iron or a baking sheet, it’s important to keep the dough cold and not use too much flour. This guarantees soft, delicate layers each time. Let’s prepare to bake!
Making Your Sweet Potato Biscuits
The smell of golden biscuits baking brings a sense of comfort. It’s the time when all your effort is rewarded, and the kitchen becomes cosy. To get that ideal golden crust and soft inside, a few important steps really matter.
Tips for Preheating and Baking
First, preheat your oven to 400°F. This temperature allows for uniform baking and a crunchy outside. I always do the sizzle test by dropping a few drops of water on the oven rack. When they sizzle and disappear, it’s good to go.
Put your baking sheet on the bottom rack to avoid burning. This easy method prevents the bottoms from getting too dark while the tops become golden. Bake for 25 to 30 minutes, turning the pan halfway to ensure even browning.
See how the pale dough changes to a golden colour, and the smell becomes hard to resist. What’s my main principle? Gently tap the top. If it sounds empty, they’re finished. A kitchen timer or a phone alarm is very helpful for cooks who prefer traditional methods.
Using Cast Iron for Crispy Bottoms
Cast iron is my go-to for achieving crispy bottoms. It keeps heat well, which helps with even baking and gives a nice crunch. Heat the skillet in the oven for 5 minutes before putting in the dough. This step imitates the conditions found in professional baking.
Cast iron works well because it spreads heat evenly, which stops hot spots from forming. The outcome? Biscuits that are golden on the outside and soft on the inside. To add more flavour, I sometimes brush the tops with melted butter, but this step is optional.
No matter if you’re using cast iron or a baking sheet, the important thing is to be patient. Allow the biscuits to cool for a few minutes before you serve them. This helps the flavours blend and the texture become firmer.
How to Serve and Store Your Biscuits
As soon as you take these golden treats out of the oven, the real excitement starts. Whether you’re enjoying them right away or keeping them for later, some easy tips can enhance your experience. Let’s look at the best ways to enjoy and keep these treats.
Perfect Pairings for Golden Treats
These creations are incredibly versatile. Here are some of my favourite ways to serve them:
- Breakfast Sandwich: Slice one open, add scrambled eggs, crispy bacon, and a drizzle of honey for a hearty start to the day.
- Holiday Meal: Pair them with roasted turkey or glazed ham for a festive touch.
- Savory Toppings: Spread with herb butter or top with melted cheese for a quick snack.
- Sweet Treats: Add a dollop of whipped cream and fresh berries for a dessert twist.
Storing and Reheating Tips
To keep them fresh, store in an airtight container at room temperature for up to two days. For longer storage, freeze them for up to six months. Here’s how to reheat like a pro:
- Broiler Method: Brush with butter and broil for 1-2 minutes for a crispy finish.
- Reviving Stale Biscuits: Sprinkle with water, wrap in foil, and bake at 350°F for 5-10 minutes.
- Freezing Dough: Shape and freeze raw dough for fresh-baked treats anytime.
Gift them in a pretty box with a ribbon for a thoughtful homemade present. My favourite midnight snack? Warm one up, add a slice of cheese, and enjoy with a cup of tea.
Pro Tips for the Best Sweet Potato Biscuits
Making these delicious treats requires more than just sticking to a recipe; it’s the small details that truly matter. Throughout the years, I’ve picked up some tips that can turn good results into unforgettable ones. I want to share the valuable cooking tips I’ve learnt over time.
The “twist don’t press” cutting technique is truly a game-changer. When shaping the dough, gently twist the cutter rather than pressing down. This creates neat edges and allows the layers to rise nicely. It’s a tiny step, yet it creates a significant difference.
When baking in a warm climate, it’s important to chill the dough. Chill the ingredients to get flaky layers, so place the dough in the fridge for 10-15 minutes before cutting. If you’re baking at high altitudes, use a little less baking powder to avoid too much rising.
Gluten-Free?
Is it gluten-free? It’s all good. Replace regular flour with a gluten-free blend in equal amounts and include a teaspoon of xanthan gum to help with structure. The texture will remain soft and tasty. If you’re getting ready for a group, make double the amount and freeze half for later use. It saves a lot of time.
Children can join in on the fun as well! Give them easy jobs, such as spreading butter on the tops or dusting flour on the counter. It’s a wonderful way to engage them and show them the fun of baking.
Disaster?
Disasters occur, but they can be resolved. If your dough is sticky, just add a little more flour. Is it overcooked? Apply a bit of milk or butter to make them softer. Yes, I’ve had my share of mistakes—like the time I forgot the baking powder. Let’s just say, they resembled hockey pucks more than biscuits!
For more baking tips, check out this guide on perfect biscuit temperatures. It’s a great resource for nailing the prep and baking process every time.
Enjoy Your Homemade Sweet Potato Biscuits
Baking these golden treats is not just about following a recipe; it’s a chance to take your time and enjoy the experience. In only 45 minutes, you will make 14 servings that are great for sharing. This is an opportunity to connect with tradition, whether you’re sharing it with the next generation or adding a seasonal twist like pumpkin spice.
Opening a warm biscuit filled with steam brings pure happiness. The smell, the warmth, the soft layers—it’s a memory that stays with you. Please share your creations with our cooking community. Your photos encourage others to try this recipe and add their personal touch.
I appreciate you taking the time to be with me in the kitchen. Keep an eye out for our upcoming recipe in the biscuit series. Let’s bring back family dinners, one delicious dish at a time. Savour each bite!
Sweet Potato Biscuits
Ingredients
Method
- Roast or boil 1 large sweet potato until soft. Let it cool, peel it, and mash until smooth. Chill it in the fridge to make sure it’s cold when added to the dough.
- In a large bowl, whisk together the flour, baking powder, baking soda, salt, and sugar.
- Add cold, cubed butter. Use your hands or a pastry cutter to work it into the flour until it looks like coarse crumbs with some pea-sized butter pieces left.
- Add 1 cup of cold mashed sweet potato and mix gently with a fork or your hands. Don’t overmix.
- Add 1 tablespoon of milk at a time until the dough just comes together. It should be slightly sticky but not wet.
- On a lightly floured surface, pat the dough into a rectangle. Fold it in thirds like a letter, then flatten gently. Repeat this fold-and-pat process 3–4 times for flaky layers.
- Pat the dough to about ¾-inch thickness. Use a biscuit cutter or glass to cut out biscuits. Don’t twist the cutter—just press down and lift straight up.
- Place the biscuits on a plate or tray and chill in the fridge for 10–15 minutes. This helps keep them tall and flaky.
- Place a cast iron skillet (or oven-safe pan) in the oven and preheat to 220°C (425°F).
- Lightly grease the hot skillet with butter or bacon fat. Place the biscuits in the skillet, close together so they rise up, not out. Brush the tops with butter. Bake for 15–20 minutes or until golden brown and puffed.
- Let them cool slightly and enjoy warm with butter, jam, or gravy.
Notes
- Make sure everything is cold—especially the butter and mashed sweet potato. This helps make the biscuits fluffy and flaky.
- Folding the dough builds layers, so don’t skip it.
- These biscuits are best served warm, but you can freeze the unbaked dough for later too.
- You can add a bit of cinnamon or nutmeg if you want a sweeter version.
FAQ
Can I use canned sweet potato purée?
Yes, canned purée works well, but make sure it’s unsweetened and drained of excess liquid for the best texture.
How do I store leftover biscuits?
Keep them in an airtight container at room temperature for up to 2 days or freeze them for longer storage.
Can I make the dough ahead of time?
Absolutely! Prepare the dough, shape it, and refrigerate for up to 24 hours before baking.
What’s the best way to reheat biscuits?
Warm them in a 350°F oven for 5-10 minutes or toast them lightly for a crispy exterior.
Can I substitute all-purpose flour with gluten-free flour?
Yes, but the texture may vary slightly. Use a 1:1 gluten-free blend for best results.
How do I achieve flaky layers in my biscuits?
Handle the dough gently and avoid overmixing. Folding the dough a few times before cutting helps create layers.
Can I use a different type of milk?
Yes, any milk—dairy or non-dairy—works well. Just ensure it’s at room temperature for even mixing.
What’s the best way to cut the biscuits?
Use a sharp, floured cutter and press straight down without twisting to help them rise evenly.
Can I add spices to the dough?
Absolutely! Cinnamon, nutmeg, or a pinch of cayenne can add a delightful twist to the flavor.
Why should I use cast iron for baking?
Cast iron retains heat well, giving the bottoms a crispy, golden finish that’s hard to resist
About The Author
John
John Watson is the passionate food enthusiast behind MePlusFood.com. With a deep love for exploring culinary delights, he shares honest restaurant reviews, mouthwatering recipes, and culinary adventures. Join John on his flavorful journey to savor the world one bite at a time.