Potato Fritters Recipe: Crispy and Delicious
You want a simple potato fritters recipe that gives crisp edges and a soft center without fuss, and I’ll show you how in a few clear steps.
Jump to Recipe
I’ll walk you through grating, squeezing out moisture, and binding with a touch of flour or egg so each cake holds together and fries golden. I use a hot skillet and a thin film of oil, flipping after about three to four minutes per side for a perfect finish.
These bites work as a snack, breakfast treat, or quick side dish for a casual meal. I’ll keep the ingredient list short, share time-saving tips, and give fixes for sticking or soggy middles so you feel confident from the first grate to the last bite.
Total time is about 20 minutes, and by the end you’ll have a reliable approach to this classic food that fits into busy evenings or relaxed weekends.
Key Takeaways
- Simple steps deliver crispy edges and soft centers in about 20 minutes.
- Squeeze out liquid well to prevent soggy middles.
- Short ingredient lists make this dish easy for weeknights.
- Heat the pan properly and flip after 3–4 minutes per side.
- I’ll share quick fixes, make-ahead tips, and serving ideas for breakfast or a casual meal.
Why You’ll Love This Potato Fritters Recipe
These crisp-edged cakes with tender centers are my go-to when I want a quick, comforting snack. I keep the method simple so you can turn pantry staples into something that feels special in no time.
Crispy edges, soft centers, and ready in minutes
Grated fritters cook fast—about 3–4 minutes per side in a hot skillet—so you can go from bowl to plate in roughly 20 minutes. Heat control is the key; a steady medium-high keeps the outside golden and the inside tender.
Snack, appetizer, breakfast, or side—your call
I love how flexible this dish is. Serve a few as a snack, plate them as an appetizer, or slide them next to eggs for breakfast.
- You’ll be eating in minutes, with crackling edges and a soft center.
- Thin cakes give more crunch; thicker ones are pillowy but need more time.
- Flavor is simple and crowd-friendly, perfect for family food moments.
- The method is forgiving—I’ll point out when to flip and how to manage heat so they turn out right.
Ingredients You’ll Need (Simple Pantry Staples)
Gathering the right basics makes all the difference—simple pantry items turn into crisp, golden patties fast. I like to keep the list short so you can grab what’s on hand and cook tonight.
Use 1 lb peeled and grated potatoes (about 3 packed cups), plus an optional 1/4 cup grated onion for moisture and flavor. In one bowl mix the grated potato with 3 tablespoons flour, 1/4 teaspoon garlic powder, 1 teaspoon dried thyme, 1/4 teaspoon baking powder, an egg yolk, and a pinch of salt and black pepper.
A slick of olive oil in the pan is all you need for frying. If you want a twist, fold in a small handful of sharp cheese or a tablespoon of chopped green onion or dill for freshness.
Quick notes
- Pick starchy varieties like Yukon Gold or Russet for a crunchy outside and tender inside.
- Flour and egg act as binders; baking powder keeps things light.
- Measure with a teaspoon or cup if that helps—everything comes together in one bowl for easy cleanup.
Essential Tools and Pan Setup
Let’s talk about the handful of tools that actually make frying simple and reliable. Keep this list short—most items are probably already in your kitchen.
Grating and handling
I usually grate potatoes on the large side of a box grater for shreds that crisp up. A food processor works well if you want to save time.
Set a big bowl beside you so the shreds land right in. Then squeeze out moisture in a clean tea towel before mixing.
Best pan and heat tips
Use a nonstick skillet for easy flipping, or a cast iron pan for the best crust once it’s fully hot. Preheat the pan so the first cake sizzles.
Pour a thin layer of oil into the pan and keep the heat at medium. If edges brown too fast, lower the heat a touch for even cooking.
| Tool | Why I like it | Quick tip |
|---|---|---|
| Box grater | Easy, creates coarse shreds | Grate over a bowl to reduce mess |
| Nonstick skillet | Simple flipping, less sticking | Use light oil and moderate heat |
| Cast iron pan | Superior crust once hot | Preheat longer for best sear |
Potato Fritters Recipe: Step-by-Step Instructions
Follow these clear instructions and you’ll be flipping golden rounds in about twenty minutes. I’ll keep each step short so you can cook without thinking twice.
Grate and remove excess moisture
Grate the potato (add 1/4 cup grated onion, optional). Put the shreds in a clean towel and squeeze hard until the pieces feel dry to the touch. This step prevents a soggy center and gives better browning.
Combine the mixture in a bowl
In a bowl, mix the squeezed shreds with 3 tablespoons flour, 1/4 teaspoon garlic powder, 1 teaspoon dried thyme, 1/4 teaspoon baking powder, one egg yolk, salt, and pepper. Stir until the potato mixture looks even.
Fry in a hot skillet and adjust heat
- Heat a thin sheen of olive oil in a skillet over medium. Flick a tiny bit of batter in — when it sizzles, the pan is ready.
- Scoop 3–4 tablespoons of mixture, set in the pan, and press slightly to flatten.
- Cook 3–4 minutes per side until the surface is golden brown and the center is set. If edges brown too fast, lower the heat a touch.
- Drain cooked pieces on paper towels and repeat in batches, adding oil as needed.
| Issue | Quick fix | Timing tip |
|---|---|---|
| Soggy center | Squeeze more liquid from shreds | Ensure 3–4 minutes per side at steady heat |
| Burning edges | Lower heat slightly | Widen the patty or reduce pan heat |
| Falling apart | Add a teaspoon more flour or mix in egg | Make smaller 3–4 tbsp portions for even cook |
Quick tip: work in small batches, keep the pan steady, and you’ll have consistent results every time.
Mashed Potato Fritters Variation
Leftover mash can turn into a golden, crunchy snack with only a few extra steps. I’ll keep this friendly and practical so you can make it tonight.
What to mix
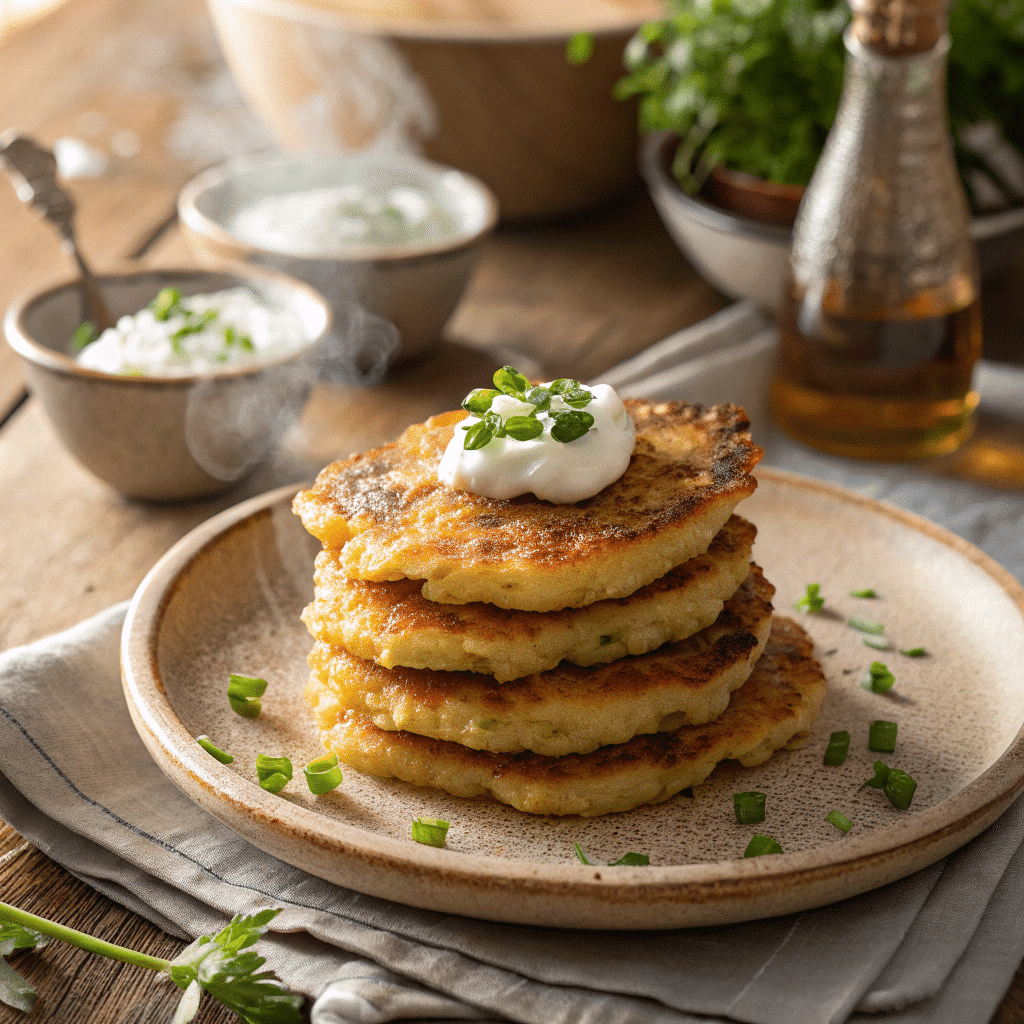
In a bowl combine 3 cups mashed potato with 2/3 cup shredded sharp cheddar, a handful of chopped green onion or chives, one beaten egg, and 1/4 cup flour. The mixture should feel soft but hold together when pressed.
Form and fry
Divide into 12 balls, flatten to about 1/2 inch, and dredge lightly in the remaining flour. Heat 1/4 inch oil in a nonstick pan or cast iron skillet until hot.
Fry without moving for 3–5 minutes per side. Wait until the first side is golden brown before flipping. Drain on paper and serve warm.
| Aspect | Result | Tip |
|---|---|---|
| Texture | Pillowy interior, crisp shell | Use mashed mash that is not overly wet |
| Binding | Egg + flour hold patties | Add a bit more flour if needed |
| Pan choice | Nonstick or cast iron skillet | Keep oil hot, flip after golden brown |
- If you’ve got leftover mashed potato, this gives a soft center with a crisp shell.
- Stir cheese, green onion, and a beaten egg into the bowl to boost flavor and hold.
- Form, dredge, then fry in hot oil until both sides are crisp and golden.
Get That Perfect Texture Every Time
Nail the texture and you’ll enjoy crisp edges with a tender middle every single time. I’ll share quick, visible cues you can use while cooking so you spot and correct problems fast.
How to keep fritters from falling apart
Squeeze the potatoes well; a dry mixture binds better with a small amount of egg and flour. Mix evenly so every bite has enough binder—uneven mixing causes crumbly spots.
Thin vs. thick cakes: cook time and doneness
For thin, lacy cakes press patties gently and reduce time per side. Thicker ones need lower heat or a short covered finish so the center cooks without burning the surface.
Golden brown without greasy results
Use just enough oil to coat the pan and let the skillet regain heat between batches. If edges brown too quickly, lower the heat—aim for a golden exterior and cooked center.
- If the mixture is loose, add a spoonful of flour; if dry, add a little extra egg.
- Work in small batches so each piece fries instead of steams.
| Style | Heat | Timing |
|---|---|---|
| Thin | Medium-high | 2–3 min/side |
| Thick | Medium to medium-low | 3–5 min/side, or cover briefly |
| General tip | Steady skillet heat | Let pan reheat between batches |
Flavor Boosts and Creative Add-Ins
A little creativity in the mixing bowl goes a long way toward bold, homey results. I keep suggestions simple so you can customize without fuss.
Herbs, spices, and small measures
Fold a teaspoon of dried thyme or rosemary into the mix for a woodsy note. If you prefer fresh, swap in dill or chopped green onion for a brighter aroma.
Add a pinch of garlic powder and black pepper to deepen flavor. Paprika brings color and gentle warmth; a dash of cayenne adds heat if you like spice.
Cheese, veg, and meaty twists
Stir in a small cup of shredded cheese—sharp cheddar melts well and gives bold taste. For a lighter twist, grate in zucchini, squeeze dry, and fold gently.
Bacon crumbles or cooked sausage make the cakes savory and hearty. These ideas work across many recipes and keep things interesting.
| Add-in | Flavor | Suggested amount |
|---|---|---|
| Dried thyme | Woodsy | 1 teaspoon |
| Shredded cheese | Rich, melty | 1 cup |
| Grated zucchini | Moist, mild | 1/2 cup (squeezed) |
Serving Ideas and Sauces That Shine
When it’s time to plate, a few simple sauces and pairings turn humble cakes into a memorable dish. I’ll paint a quick picture of pairings so you can plate with confidence and feed people who’ll smile at the first bite.
Favorite sauces
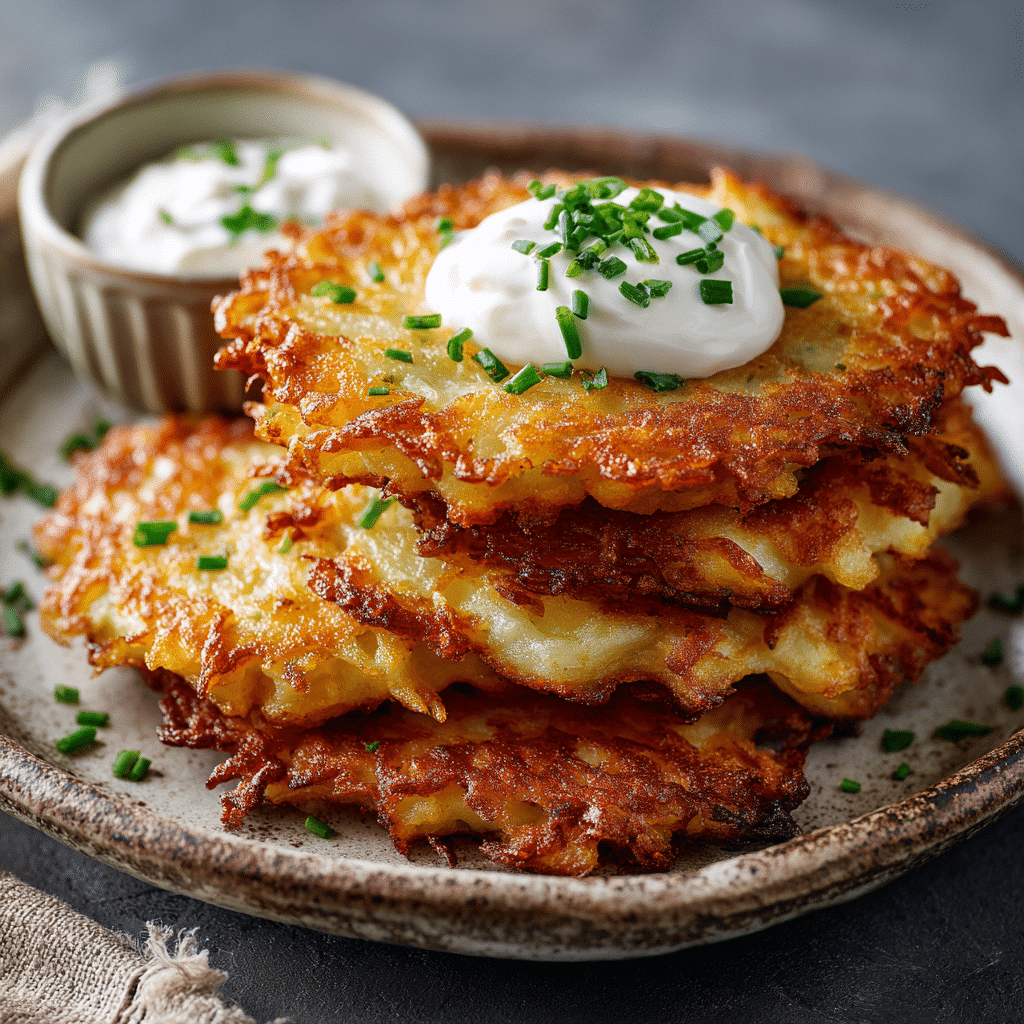
- I love a cool dollop of sour cream and chives—the tangy cream cuts through the crispy richness perfectly.
- Garlic aioli is savory and bold; applesauce adds a sweet contrast if you like a nod to latkes.
- Set out small cup portions of multiple dips so everyone picks their favorite.
What to serve with them
Serve as a side dish with roasted chicken, seared steak, or flaky salmon. They work great next to a fresh salad or as part of a relaxed breakfast topped with a fried egg and salsa.
Keep cooked fritters warm on a pan in a 200°F oven while you finish frying, so everything hits the table hot.
| Sauce | Flavor | Best with |
|---|---|---|
| Sour cream & chives | Tangy, cool | Roasted chicken, salad |
| Garlic aioli | Savory, rich | Seared steak, pan-seared salmon |
| Applesauce | Sweet, bright | Classic match for potato cakes |
Make-Ahead, Storage, and Reheating Tips
Leftovers can taste nearly as good as fresh if you store and reheat them the right way. I’ll give clear steps so you enjoy that just-fried crunch later.
Cool and store the right way
Let each piece cool on paper towels first. This sheds surface oil and keeps the exterior crisp.
Once cool, transfer to an airtight container and refrigerate. They’ll hold well for about three days.
Reheat to revive the crunch
Warm a lightly oiled pan over medium. Reheat a few minutes per side until the crust comes back. The oven works too—spread on a tray and heat until crisp, watching so they don’t overbrown.
Freezing and thawing
- Freeze in a single layer with parchment between pieces so they don’t stick.
- Keep frozen up to three months; thaw overnight in the fridge for best texture.
- If cooking a lot at once, keep finished pieces warm in a low oven (about 200°F) while you finish the batch.
| Method | Storage time | Reheat tip |
|---|---|---|
| Fridge in a container | Up to 3 days | Warm in a pan with a little oil |
| Freezer, single layer | Up to 3 months | Thaw overnight, reheat in pan or oven |
| Keep warm | Short time while cooking | 200°F oven to hold without sogging |
Nutrition Notes and Smart Swaps
Small swaps can cut calories and add bright, vitamin-rich flavor without changing how you cook. I’ll keep this friendly and practical so you can tailor the fritters to your needs.
Lighten the fat and boost vitamins with herb add-ins
If you’re watching fat, fry in a thinner layer of oil and drain well on paper. That keeps a crisp crust without feeling heavy.
Boost vitamins by folding in chopped dill, parsley, or green onion. Fresh herbs add bright flavor and feel lighter than cream or extra cheese.
Gluten-free flour options and vegan tweaks
Swap regular flour for a gluten-free 1:1 flour and follow the same method. It’s an easy win for guests with gluten needs.
To go vegan, replace the egg with an egg replacer and use plant-based cheese or skip dairy. The texture holds up well with these swaps.
- If you’re watching fat, fry in a thinner layer of oil and drain well—crisp without feeling heavy.
- Boost vitamin-rich freshness by folding in dill, parsley, or green onion.
- Swap in a gluten-free 1:1 flour and the method stays the same—easy win.
- For vegan fritters, use an egg substitute and skip dairy cheese or use your favorite plant-based option.
- Keep seasoning simple: a teaspoon of garlic powder or paprika adds flavor without extra richness.
| Swap | Why try it | Quick note |
|---|---|---|
| Less oil | Lower fat, lighter bites | Drain on paper towels |
| Fresh herbs | More vitamins and aroma | Fold in at the end |
| Gluten-free flour | Same method, gluten-free | Use 1:1 blend |
| Egg replacer / plant cheese | Vegan-friendly | Works well for binding and flavor |
A typical serving of grated potato fritters runs about 150–160 kcal, depending on oil absorption and size. I like to note oil amount and batch size when I try new recipes so I can repeat the version I love.
Common Mistakes and Easy Fixes
When things stick, burn, or stay raw inside, a couple of easy moves usually fix it fast. I’ll keep solutions calm and practical so you know exactly what to try next.
Too wet or too dry: adjusting flour and egg
If the potato mixture feels loose, sprinkle in a teaspoon or two of flour, fold gently, and test a small patty. Add flour one tablespoon at a time until it holds.
When the mix is dry and crumbly, whisk in a beaten egg. That little egg brings moisture and binding without adding time.
Sticking, burning, or undercooking: heat and size fixes
Sticking usually means the pan wasn’t hot enough or you flipped too soon. I use a well-heated skillet or nonstick pan and wait until edges brown before turning.
If edges burn, lower the heat a notch and shorten time per side. For undercooked centers, make smaller patties—no more than 3–4 tablespoons—or press them thinner so frying cooks through evenly.
- Season with salt and pepper right after frying to lift flavor.
- Drain finished pieces on paper towels so extra oil wicks away and the crust stays crisp.
- A steady skillet temperature and patient flipping are your best tools for success.
| Issue | Fix | Quick tip |
|---|---|---|
| Too wet | Add flour, 1 tbsp at a time | Test small patty |
| Too dry | Add beaten egg | Mix lightly to avoid gluey texture |
| Undercooked center | Smaller size, lower heat | 3–4 tbsp portions cook evenly |
Conclusion
Ready to turn simple pantry staples into a golden, crowd-pleasing side tonight? I’ve given you a clear potato fritters recipe and easy instructions to follow.
Both grated and mashed potato versions fry in just a few minutes per side in preheated oil. Serve with a small cup of sour cream, aioli, or applesauce and keep finished batches warm at 200°F.
No added sugar needed—the natural flavors shine. Try the zucchini add-in or the mashed potato twist and note what you liked so you can repeat it.
Tap print to save a copy for your kitchen binder, then come back and leave a rating. I can’t wait to hear which version became your new favorite.
Crispy Potato Fritters
Ingredients
Method
- Grate & Drain – Grate potatoes (and optional onion). Place in a clean tea towel and squeeze out as much liquid as possible until dry to the touch.
- Mix the Batter – In a large bowl, combine grated potato, flour, garlic powder, thyme, baking powder, egg yolk, salt, and pepper. Stir until evenly mixed.
- Preheat Pan – Heat a nonstick or cast iron skillet over medium with a thin layer of olive oil. Test heat by dropping in a small bit of mixture—it should sizzle.
- Shape & Fry – Scoop 3–4 tablespoons of mixture per fritter into the pan. Press lightly to flatten. Cook 3–4 minutes per side until golden brown and crisp.
- Drain & Serve – Transfer cooked fritters to a paper towel-lined plate. Serve hot with sour cream, aioli, or applesauce.
Notes
- Squeezing out the liquid is key for crisp edges and preventing soggy centers.
- If fritters brown too quickly, lower heat slightly for even cooking.
- Work in small batches so the oil stays hot and fritters fry instead of steam.
- Try the mashed potato variation for a softer, pillowy interior.
FAQ
How do I get crispy edges and soft centers every time?
Drain grated potatoes well, squeeze out excess moisture with a clean towel, then mix with just enough flour and one beaten egg to bind. Fry in hot oil (about 350°F) and don’t crowd the pan so the temperature stays steady. Flip once when the underside is golden brown for an even texture.
Can I use leftover mashed potatoes instead of grated ones?
Yes. Leftover mashed potatoes make pillowy fritters. Add an egg and a few tablespoons of flour to firm the mixture, shape gently, and dredge lightly before frying to get a crisp exterior.
What potatoes work best for these fritters?
Starchy varieties like Russets give a fluffier interior and better browning. Waxy types (Yukon Gold) hold together well and taste great if you prefer a slightly denser texture.
How do I keep fritters from falling apart while frying?
Make sure the mixture isn’t too wet — squeeze out liquid and adjust with a little flour. Use an egg to bind, press each patty firmly before frying, and cook on medium heat so they set through before overbrowning.
Can I make them gluten-free or vegan?
For gluten-free, swap regular flour for chickpea or rice flour. For a vegan version, replace the egg with mashed banana, flax egg (1 tbsp flax + 3 tbsp water), or a commercial binder, and use oil instead of butter.
What are good add-ins to boost flavor?
Try green onion, dill, grated cheese like cheddar or Parmesan, cooked bacon bits, or shredded zucchini. A pinch of smoked paprika or garlic powder adds depth. Mix gently so the texture stays light.
How long do leftovers keep and how should I store them?
Cool on paper towels, then store in an airtight container in the fridge for up to 3 days. For longer storage, freeze in a single layer on a tray, then transfer to a freezer bag for up to 2 months.
Best way to reheat to retain crispiness?
Reheat in a skillet over medium heat with a little oil, or bake at 375°F on a wire rack for 8–12 minutes. Microwaving makes them soggy, so avoid that if you want crunch.
How do I avoid greasy fritters?
Keep the oil at a steady medium-high so the exterior seals quickly. Drain cooked fritters on paper towels or a wire rack. Don’t use oil that’s too shallow — enough to come halfway up the sides helps even cooking.
Can I scale the batch up for a crowd?
Yes. Multiply ingredients and fry in batches rather than crowding the pan. Keep finished fritters warm on a baking sheet in a 200°F oven while you finish cooking the rest.
About The Author
John Watson
John Watson is the passionate food enthusiast behind MePlusFood.com. With a deep love for exploring culinary delights, he shares honest restaurant reviews, mouthwatering recipes, and culinary adventures. Join John on his flavorful journey to savor the world one bite at a time.