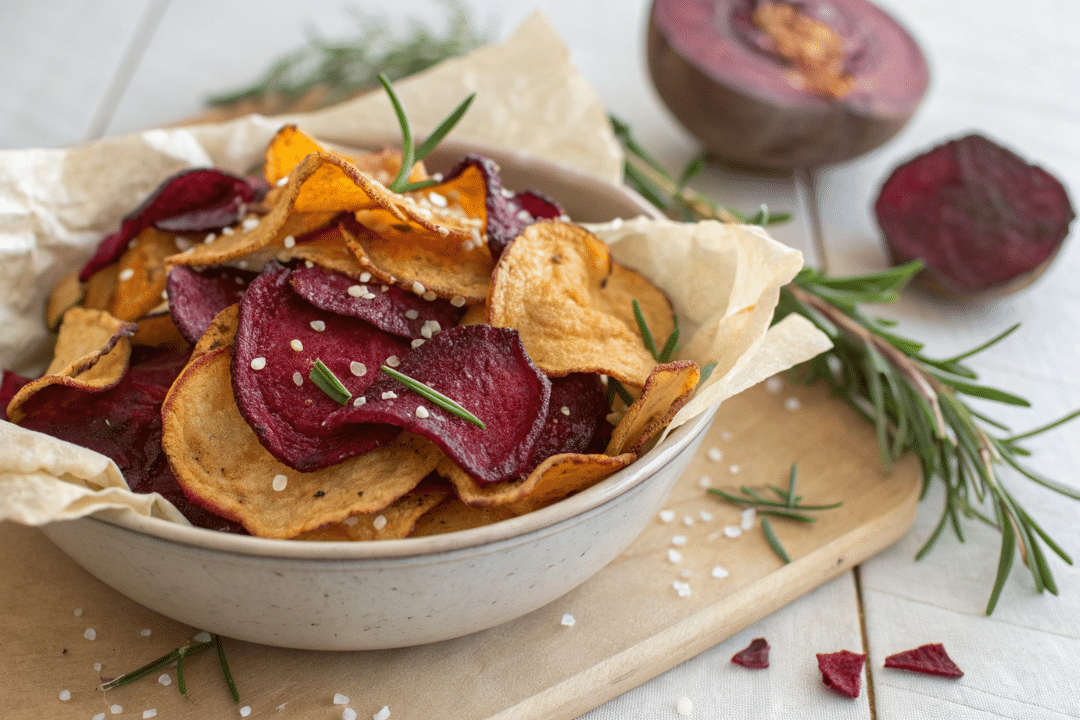
Crispy Baked Beet Chips Recipe – Easy and Delicious
I love how simple baked beet chips turn humble roots into a crunchy, colorful snack that feels special and low-effort. I slice the beets paper-thin—about 1/16 inch on my mandolin—then salt them and let them rest for 15–30 minutes to draw out moisture before baking at 300°F on parchment-lined sheets.
My hands-on tips save you time and worry: arrange a single layer, watch rack placement, and bake for 40–60 minutes until the edges are dry and the centers are firm. I separate red and golden beets when seasoning so colors stay bright, and I always use the mandolin guard and a cut-resistant glove for safety.
By the end, you’ll have a repeatable recipe for crisp, light slices that store in an airtight jar up to two weeks. I also share quick flavor riffs—sea salt, black pepper, herbs, or a sweet-heat sprinkle—so every chip fits your snack board or dip night.
Key Takeaways
- Slice to 1/16-inch and salt for 15–30 minutes to remove moisture.
- Bake at 300°F on parchment for 40–60 minutes; look for dry edges, no browning.
- Separate red and golden roots when seasoning to prevent color bleed.
- Use a mandolin guard and cut-resistant glove—safety first.
- Store cooled crisps in an airtight container at room temperature for up to two weeks.
- Pull finished pieces and return others to the oven to avoid overbrowning.
Why these Beet Chips Turn Out Shatteringly Crisp in a Home Oven
A gentle oven and a quick salting step are the two tricks that turn ordinary roots into glassy, shatteringly crisp snacks. I treat the oven like a dehydrator: set the oven to 300 and give the slices time to lose water slowly. That prevents scorched edges while the centers dry through.
The Low-and-Slow Bake at 300°F Acts Like a Dehydrator
Low heat lets moisture evaporate gradually, so sugars don’t brown before the slices are dry. I keep slices thin and uniform so every piece dehydrates at the same pace. The result is crisp texture with accurate color and less risk of bitter notes.
Salted “sweat” Step: Releasing Moisture Before Baking
I sprinkle salt and let the slices rest 15–30 minutes. Salt pulls water to the surface—think of it as a pre-dry—so you drain off that liquid and the slices go into the oven drier and more predictable.
- First, salt the meat, then drain off the released moisture, and finally bake at a low heat.
- Thin, even slices finish together; uneven ones won’t.
- Low-and-slow gives you margin for time—chips crisp without burning fast.
Ingredients that Make a Difference
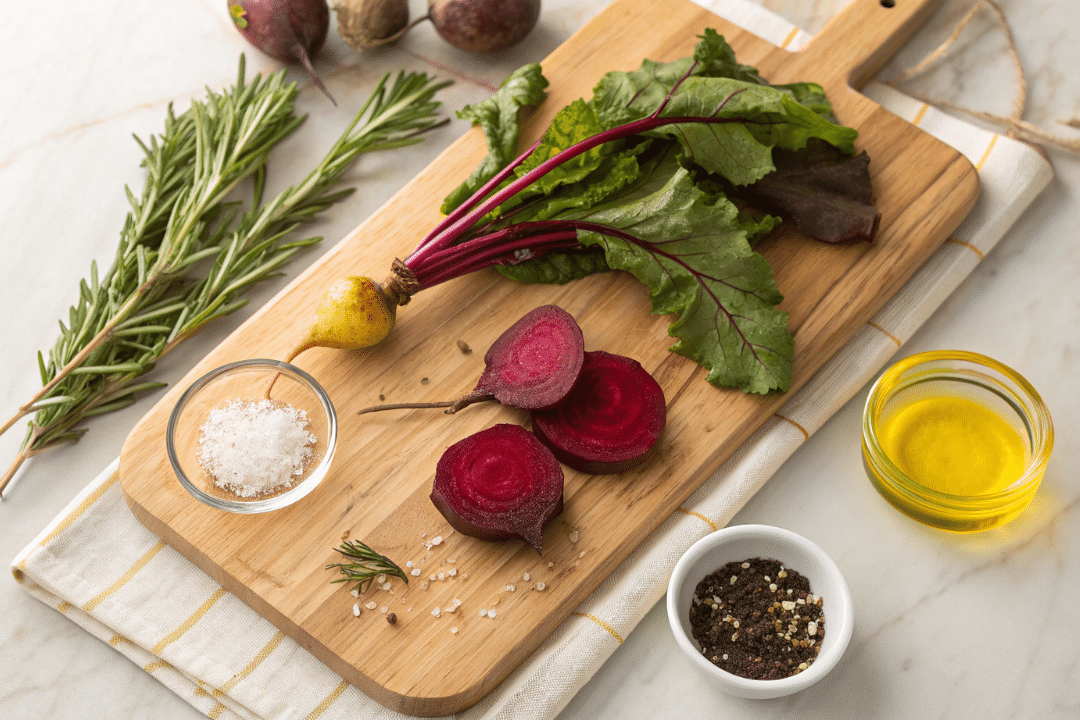
Picking the right produce and a few thoughtful pantry items sets you up for a perfect crunch every time. I reach for firm, fresh beets—red, golden, or a mix—so the texture is crisp, not floppy.
Beets: Red Beets, Golden Beets, or a Mix
Red beets bring an earthy sweetness; golden beets taste milder and stain less. If you slice paper-thin, I don’t bother peeling—the skins are crisp and add flavor. Keep red and golden slices in separate bowls while seasoning to protect color.
Olive Oil vs. Avocado Oil: Flavor and Smoke Point
Olive oil gives a round, fruity note. Avocado oil is neutral and has a higher smoke point. Both work at 300°F; choose olive oil for a slightly richer flavor, or avocado oil for a cleaner finish.
Salt Choices and When to Add Black Pepper
I start with sea salt or celery salt during the sweat step; celery salt adds a savory backbone. Use fine salt to pull moisture and save flaky finishing salt for the end. Add black pepper after baking or at the final toss so its oils don’t scorch.
- Measure salt by feel after a trial batch—start small, taste, then adjust.
- Try garlic powder or dill as easy seasoning upgrades before baking.
| Ingredient | Why I use it | Tip |
|---|---|---|
| Red beets | Earthy sweetness | Separate when seasoning |
| Golden beets | Milder, cleaner hands | Great with dill |
| Olive oil | Fruity flavor | Use extra-virgin for more aroma |
Gear Check: the Tools that Guarantee Even, Crunchy Chips
A few simple tools make this recipe far less fussy and much more consistent. I keep a kit that helps me slice, season, and bake with confidence.
Sharp Blades and Safe Slicing
I reach for a mandolin to get 1/16-inch beet slices. Uniform thickness equals even crispness and fewer scorched outliers.
If you don’t have a mandolin, a sharp knife or a vegetable peeler works. Chill the beets and use long, steady strokes for cleaner cuts.
Sheets, Paper, and Single-Layer Rules
I line sturdy baking sheets with parchment paper so the rounds release easily and don’t stick. Keep every piece in a single layer; overlap traps steam and makes leathery spots.
Oven Placement and Airflow
Use the center rack to avoid hot spots. When I run two trays, I move both toward the middle and rotate only if the color looks uneven.
A large bowl helps toss slices with oil and salt, and tongs or a glove keep your hands safe while you arrange them. Ensure the mandolin guard is in place and wear a cut-resistant glove for added protection.
- Mandolin: even 1/16-inch slices without fuss.
- Sharp knife: slower, but precise if you take your time.
- Parchment paper on a sheet: prevents sticking and aids moisture loss.
| Tool | Why it helps | Practical tip |
|---|---|---|
| Mandolin | Creates uniform slices | Use the guard and a cut glove |
| Sharp knife | Good backup for small batches | Chill beets and slice with long strokes |
| Parchment paper + baking sheets | Prevents sticking, improves contact | Choose sturdy sheets for even heat |
| Tongs / large bowl | Safe handling and even toss | Toss in the bowl, then lay in a single layer |
Baked Beet Chips: The Step-by-Step Method
I’ll guide you through each step, with exact cues and minutes so nothing is guesswork. These clear directions help you get crisp results without overthinking.
Prep and Slice
Preheat the oven to 300°F and line two baking sheets with parchment paper. Scrub and trim the roots, then slice about 1/16-inch thick.
Use a mandolin for speed and uniform beet slices. If you use a knife, slice slowly and keep thickness consistent.
Salt to Release Moisture
Place the rounds in a bowl, sprinkle salt, and let sit 15–30 minutes. The salt pulls out moisture—drain that liquid before you go on.
Oil, Season, and Separate Colors
After draining, toss lightly with a little olive oil or avocado oil if you wish. Keep red beets and golden beets in separate bowls so colors stay bright.
Pan Setup and Baking
Arrange slices in a single layer on the prepared sheets. Make sure edges don’t overlap so every piece dries evenly.
Bake 40–60 minutes, checking around 45 minutes. Pull any crisp pieces and return the rest for a few more minutes as needed. Cool on the pans a few minutes—the rounds firm as steam escapes and you get that glassy snap.
- Preheat oven early for stable heat.
- Salt 15–30 minutes, then drain.
- Use a mandolin for uniform thickness.
| Step | Cue | Time |
|---|---|---|
| Preheat & prep | Oven 300°F, sheets lined | — |
| Salt & rest | Release moisture, drain | 15–30 minutes |
| Bake & test | Check at 45 minutes | 40–60 minutes |
Smart Timing, Temperature, and Visual Cues
Watch for visual cues and trust small time adjustments; that’s how you keep slices crisp and bright. I check by sight and feel, not the clock alone. This keeps your beet chips from browning and keeps the flavor clean.
When they’re done: crisp but not brown
Done means dry edges, firm centers, and no brown spots. Thin pieces should snap when you bend them. If edges start to turn golden, that slice is overcooked.
Handling uneven doneness
I start checking at 40–45 minutes. At 300°F, you can safely add short bursts of minutes. Pull finished chips and let thicker slices stay in the oven a bit longer.
- I resist opening the oven too often—quick peeks keep the heat steady.
- Rotate the sheet once if your oven has a hot spot.
- Cool chips briefly in the pan; carryover finishes the crisp snap.
| Cue | What it means | Action |
|---|---|---|
| Dry edges, firm center | Ready, glassy texture | Remove and cool on the sheet |
| Thin slices snap | Done earlier than thick ones | Take off and save thicker pieces for more minutes |
| Golden browning | Overcooked, bitter risk | Lower future time or temp; avoid more minutes minscook |
| Leathery center | Needs more dehydration | Add 2–4 minutes, recheck |
Flavor Upgrades that Love Root Veggies
I like to treat roots like a flavor canvas—simple seasonings can take them from mild to memorable. Small additions can make a big difference, and timing is crucial to avoid scorching delicate herbs or overwhelming the natural sweetness.
Herb and Spice Ideas
Try garlic powder and dill tossed with the slices before they go in the oven for savory depth. I use black pepper sparingly; add it just before baking or after to avoid bitter notes.
Rosemary and thyme are powerful—crush them finely so they stick to the oil-kissed rounds without burning.
Sweet Heat Twist
For contrast, dust a pinch of smoked paprika or chili on while they’re still hot. A light drizzle of maple or a scant teaspoon of sugar, right after baking, brightens the sweet edges and rounds out the flavors.
Finishing Salts and When to Use Them
Flaky sea salt or celery salt is best suited for hot dishes. Salt applied hot will cling without drawing moisture back in. Keep amounts modest—you can always add more after the first taste.
- I toss with garlic powder and dill before baking for savory depth.
- I add black pepper lightly before or after to avoid bitterness.
- Smoked paprika plus a touch of maple makes a nice sweet-heat finish.
- Use flaky finishing salts post-bake so they stick without softening the rounds.
| Seasoning | When to Add | Amount Guideline | Flavor Note |
|---|---|---|---|
| Garlic powder + dill | Before baking | 1/4 teaspoon per 2 cups of sliced | Savory complements natural sweetness |
| Black pepper | Just before or after baking | Light pinch per sheet | Gentle heat, avoid bitterness |
| Smoked paprika + maple | Paprika before; maple after | 1/8 teaspoon paprika; 1 teaspoon maple per pan | Warm, smoky sweet-heat |
| Finishing salt (flaky/celery) | Immediately post-bake | Pinch per chip to taste | Bright pop without added moisture |
Pro Tips to Avoid Soggy or Stuck Chips
I rely on a few simple checks to keep beet chips crisp and prevent them from sticking to the sheet. These moves are easy, but they make a big difference in texture and finish.
Keep Thickness Consistent
I ensure that beet slices are uniformly thin so that all pieces bake at the same pace. Uneven rounds mean some will snap while others stay bendy.
Single-Layer Spacing
Don’t crowd the pan. A single layer with breathing room stops steam from softening edges and keeps the oven working like a dehydrator.
Dry and Oil Correctly
After the salt rest, drain the liquid and lightly pat surface moisture off the beets. I toss or brush a very thin film of oil so nothing welds to parchment paper or the pan.
- Avoid excess oil—too much oil pools and makes pieces greasy.
- If your oven has hot spots, keep trays near the center and rotate once.
- Pull early-finish pieces and cool them on the sheet so they set up crisp.
- When a slice sticks, slide a thin spatula under it while it’s still warm to free it gently.
| Problem | Why it happens | Quick fix |
|---|---|---|
| Soggy center | Uneven thickness or trapped steam | Slice thin, single layer |
| Sticking | Oil pooled or too little release | Light, even oil; use paper |
| Uneven color | Oven hot spot | Center rack, rotate once |
Storage, Batch Size, and Make-Ahead Strategy
When you plan ahead, these snacks stay crisp all week with just a little care. Cool the pieces fully on the pans so steam doesn’t soften them in the container.
Cool Completely, then Store Airtight at Room Temp
I let the rounds cool to room temperature on the baking sheets. Then I transfer them to airtight jars or tins. Stored this way, they keep well for up to two weeks.
How Long They Keep and How to Re-Crisp
If a batch softens, I re-crisp it in a 300°F oven for a few minutes. Let them cool again on paper or the pan—that final cool firms the texture for maximum snap.
Scaling Up with Multiple Baking Sheets
For large batches, run two baking sheets at once and keep racks near the center. Consistent thickness across trays keeps time predictable and avoids hot spots.
- Don’t stack warm pieces—residual heat adds moisture.
- Label jars with date and flavor so you can rotate stock.
- Keep strong-seasoned rounds separate to avoid perfume transfer.
| Action | Why it matters | Quick tip |
|---|---|---|
| Cool on pan | Prevents trapped steam | Wait until fully room temp |
| Store airtight | Maintains crunch | Use jars or tins, not plastic bags |
| Re-crisp | Restores snap | 300°F for a few minutes, then cool |
| Scale up | Even baking | Center racks, same thickness on all trays |
Nutrition, Serving Ideas, and Helpful Notes
I’ll walk you through real serving ideas, macro-minded notes, and the gear I trust for repeatable results. Below are clear, practical tips you can use right away.
Serving Size and Macros Context
I treat a serving as a generous handful. Nutrition shifts with oil and salt, so weigh portions if you track macros.
These are lighter than fried versions and add fiber as a vegetable snack. To be precise, weigh the finished pieces and the oil used, then divide by the number of servings for accurate results.
Pairings: Dips and Snack Board Ideas
Try creamy hummus, garlicky yogurt dip, or a tangy feta whip. Mix plain and herb-seasoned batches with nuts, olives, and sliced cucumbers for contrast.
A quick grind of pepper over hot pieces adds aroma without scorching.
Safety note: Mandolin Guard and Kitchen Gloves
Always use the mandolin finger guard and consider a cut-resistant glove. Keep the root flat on the carriage and never reach for the last nub with bare fingers.
Affiliate Links and Trusted Tools
I recommend sturdy rimmed baking sheets, quality parchment, and a sharp mandolin blade. You’ll find these via my affiliate links; purchases may earn me a small commission at no extra cost to you. I only link tools I use myself.
| Item | Why I use it | Quick tip |
|---|---|---|
| Mandolin | Uniform slices | Use a guard and a glove |
| Rimmed sheet | Even heat | Center rack |
| Parchment | Release and drying | Thin oil film only |
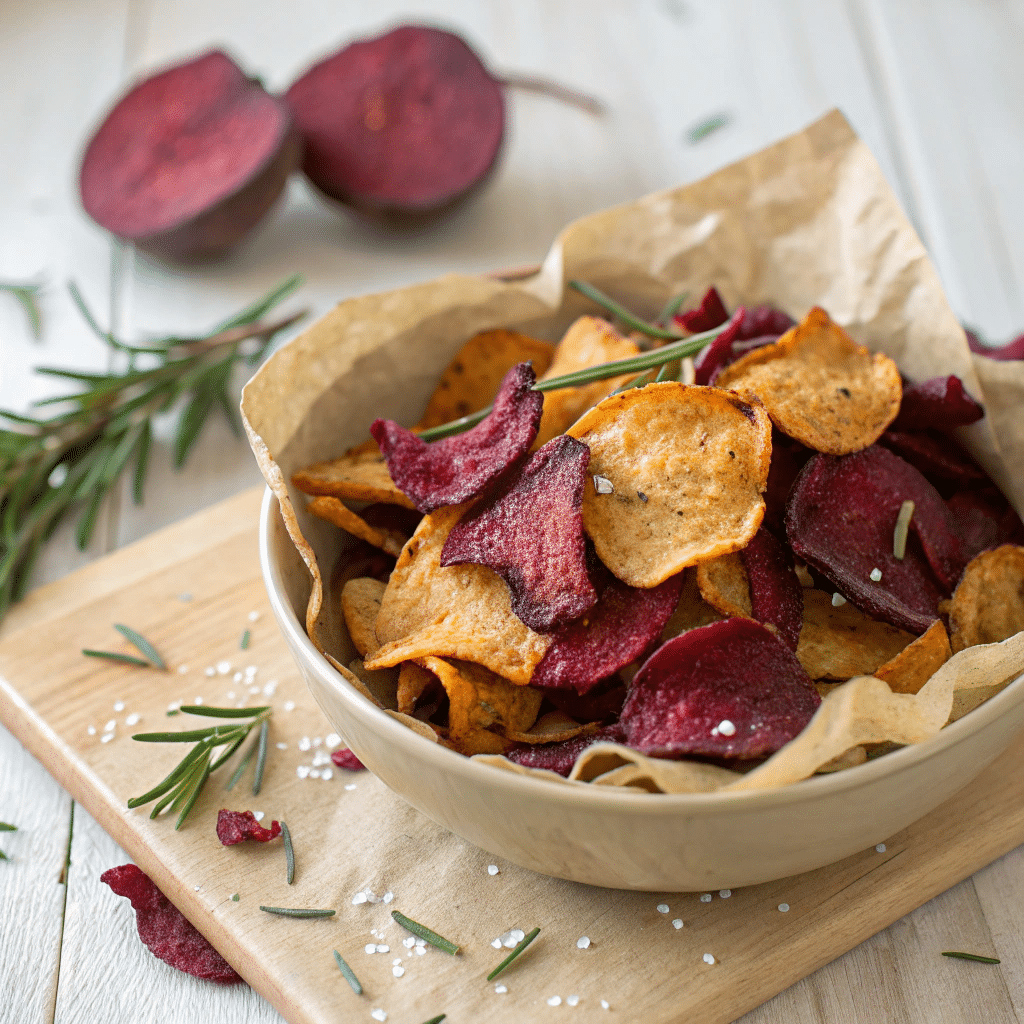
Conclusion
Nail a few steady cues and crisp results follow. I keep the oven at 300°F, slice about 1/16 inch, and let the salt pull the moisture first. That low-and-slow approach makes reliable baked beet chips at home.
Work in single layers on parchment, use the center rack, and pull early-finish pieces so nothing browns. Cool fully, then store airtight—your snack will stay crunchy up to two weeks.
This simple recipe lets you keep flavors mild or play with herbs and sweet-heat finishes. With a safe mandolin setup and these cues, the next batch is easy and repeatable…enjoy the snap.
Baked Beet Chips
Ingredients
Method
- Prep and Slice – Scrub and trim beets; slice 1/16-inch thick with a mandolin or sharp knife.
- Salt to Release Moisture – Toss slices with salt, rest 15–30 minutes, then drain liquid.
- Oil and Season – Lightly coat with oil; separate red and golden beets to protect color.
- Arrange and Bake – Place slices single layer on parchment-lined baking sheets. Bake at 300°F for 40–60 minutes, checking crispness at 45 minutes.
- Cool and Store – Cool completely on sheets; transfer to airtight containers. Re-crisp in the oven if needed.
- Optional Flavoring – Toss with garlic, dill, paprika, or a touch of maple for sweet-heat flavor.
Notes
FAQ
How do I get shatteringly crisp chips in my home oven?
Why should I salt the slices and let them sit before baking?
Which roots work best — red, golden, or both?
Should I use olive oil or avocado oil?
How thin should I slice the roots, and how do I do it safely?
Do I need parchment paper and a single layer?
Where should I place the racks in the oven?
How long do they take to bake and how do I check doneness?
What if some finish sooner than others?
What seasonings work best?
How do I prevent slices from sticking or becoming soggy?
How should I store leftovers and re-crisp them?
Can I scale up and bake multiple sheets at once?
Any safety tips for tools and prep?
How long do homemade chips keep, and what affects shelf life?
Do you recommend any gear or trusted tools?
About The Author
John
John Watson is the passionate food enthusiast behind MePlusFood.com. With a deep love for exploring culinary delights, he shares honest restaurant reviews, mouthwatering recipes, and culinary adventures. Join John on his flavorful journey to savor the world one bite at a time.