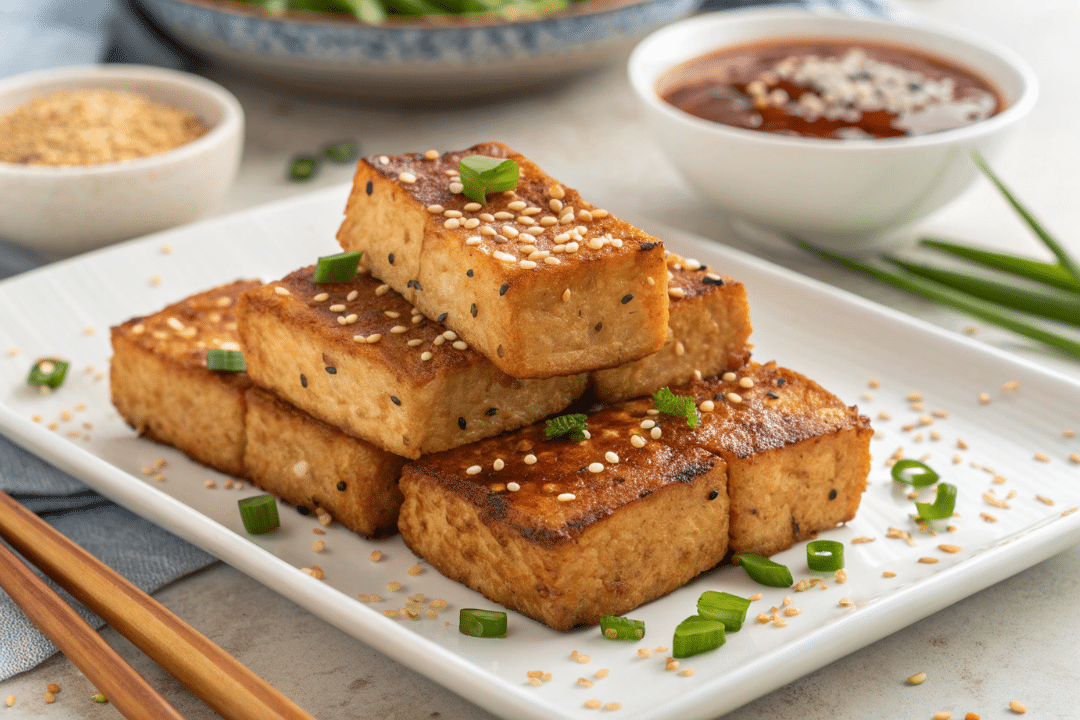
My Secret to Making Crispy Air Fryer Tofu Steaks
I love how crispy air fryer tofu steaks turn a plain block into a delight that cracks at the edge and stays soft inside.
I press my slabs to shed water, then marinate for at least 15 minutes so the flavor sinks in. I cook between 375–390°F for about 9–15 minutes, flipping halfway for even browning. A whisper of oil and a light dusting help build a crust without drying the center.
These steps are the ones I repeat on busy weeknights. I share exact time-and-temp cues, simple ingredients, and my re-crisp routine so leftovers hit the same texture when reheated at 350–375°F for a few minutes.
My goal is clear: repeatable results, bold flavor, and a satisfying protein option you can trust. No fuss. Just dependable tips and small tricks that change everything.
Key Takeaways
- Press tofu to remove water for a better texture.
- Cook at 375–390°F for 9–15 minutes, flip halfway.
- Marinate at least 15 minutes for a deeper flavor.
- Use a light brush of oil to form a thin crust without drying.
- Store 3–5 days refrigerated; freeze 1–2 months; reheat 350–375°F to re-crisp.
Why These Tofu Steaks Turn Out Shatteringly Crispy Yet Tender
The magic is in getting a snap on the outside while the center remains silky and moist. I focus on controlling moisture so heat can do its job. Less water at the surface equals faster browning and less splatter.
I press or pat with paper towels, then let a quick freeze-thaw when I’ve planned ahead. That step helps marinades sink deeper and gives a chewier, more steak-like bite. I pick extra-firm or high-protein blocks because they hold shape during a flip and stand up to higher heat.
- Hot circulated air dehydrates the surface quickly while steam stays inside, creating a glassy crust and a soft core.
- A thin film of oil improves heat transfer without greasing the taste or masking soy flavor.
- Marinate at least 15 minutes for flavor, then sauce after the fry so sugars don’t burn and garlic stays bright.
I cook between 375–390°F and flip halfway. In about 9–15 minutes the edges brown, the texture firms, and the result is a satisfying protein bite that still feels tender inside.
What You Need: Tofu, Pantry Staples, and The Right Air Fryer Setup
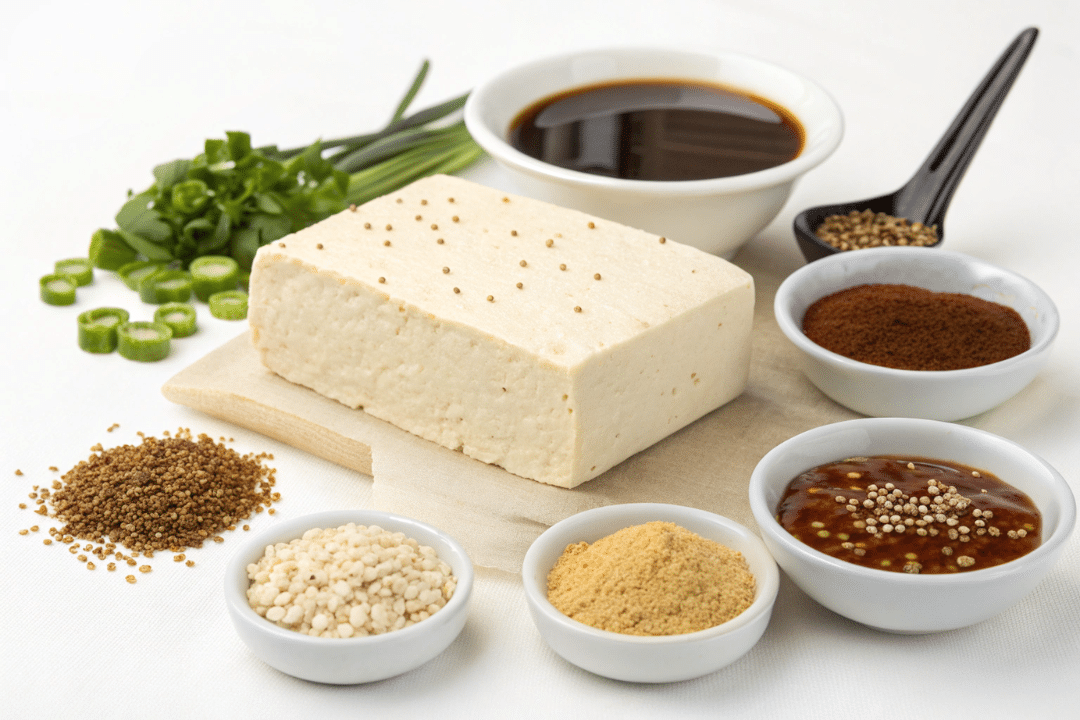
Get your prep right, and the rest becomes simple: the right block, the right tools, and a few pantry heroes.
The Block
I reach for extra-firm or high-protein tofu because it retains its shape and offers a meaty texture. Press it for at least 30 minutes; overnight is even better for firm results.
Pantry and Sauce Staples
Keep these ingredients on hand to layer flavor and texture:
- Soy sauce and a touch of maple or sugar to balance savory and sweet.
- Smoked paprika, garlic powder, and black pepper for depth.
- Neutral oil for a light mist and a splash for marinades.
- Optional cornstarch if you want extra crust before cooking.
Helpful Tools and Setup
A tofu press speeds things up, but weighted paper towels work fine when you’re in a pinch.
- Air fryer basket or fryer basket: lightly grease or spray so pieces lift cleanly.
- Paper towels for pressing and patting dry.
- A shallow dish or resealable bag for quick marinades and a small container for post-fry sauce.
- Neutral oil spray to create an even film on the basket and the steaks.
With these ingredients and tools ready, you can marinate for 15+ minutes and move to cook at 375–390°F, flip halfway, and finish in minutes. Store leftovers in a sealed container in the fridge for 3–5 days and reheat at 350–375°F for a few minutes to revive the surface.
Step-by-Step: From Pressing to Plating in Minutes
This step-by-step path takes you from press to plate with no guesswork. I keep each action short and precise so you can cook confidently and finish in minutes.
Press to Remove Excess Water For Better Texture
I press the block at least 30 minutes. Use a tofu press or wrap in paper and weight it with a heavy pan.
After pressing, pat each piece dry so the surface will brown fast.
Slice, Season, and Coat in a Bowl (Cornstarch Optional)
I slice into ¾–1-inch steaks for a meaty bite. Season simply, or add a thin cornstarch coat with a splash of soy in a bowl so it clings evenly.
Preheat and Cook in A Single Layer; Flip Halfway
I preheat the air fryer to ensure steady heat. Lay pieces in a single layer so hot air moves freely—no overcrowding.
- 375°F: 10–15 minutes; flip at halfway and watch for golden edges.
- 390°F: 9–10 minutes; flip once and judge by color rather than the clock.
I spray a light coat of oil on both the pieces and the basket to help release and brown evenly.
Toss or Brush with Sauce While Hot
Right out of the basket I toss or brush with hoisin, soy glaze, or another sauce. The heat helps the crust absorb flavor without going soggy.
Let rest 1 minute so steam fades and the surface sets before cutting and serving.
| Temperature | Time (minutes) | Flip Cue | Visual Cue |
|---|---|---|---|
| 375°F | 10–15 | At the halfway mark | Edges golden; center springs back |
| 390°F | 9–10 | Flip once at the midpoint | Rapid browning; thin glassy crust |
| After cook | 0–2 | Brush/toss while hot | Glossy finish; no soggy pooling |
Crispy Air Fryer Tofu Steaks: My Tested Time and Temperature Sweet Spots
Small changes in temperature change everything—so I charted the minutes and cues that work across models and slice thicknesses. Below are clear ranges, visual signs, and decision rules I use every time I cook.
370–390°F Guide: How Thickness and Models Change Minutes
For thin, Hasselback-style slices, I aim for near 370°F and watch at 8–9 minutes. For standard ¾-inch slabs, 375°F for about 10–15 minutes lands a deep gold without drying.
If a block is a full inch or my machine runs cool, I step up to 390°F and check at 9 minutes. Flip at the midway point for even color each time.
When to Choose 375°F vs. 390°F (and What Golden-Brown Should Look Like)
- 375°F — I pick this for a softer center and a wider doneness window; about 12 minutes for ¾-inch pieces.
- 390°F — I use this when I want faster browning and a snappier outer layer; check at 9–10 minutes.
- Visual cue — even golden-brown across the face with slightly darker corners; pale spots mean poor circulation. Rearrange in the air fryer basket and add 1–2 minutes.
- If the crust is set but the color is light, add 1–2 minutes. If the color is dark but the center feels soft, the pieces were crowded; space them and fry briefly again.
- Light oil mist helps release and speed browning. Hold back the sweet sauce until after the fry so sugars don’t burn.
- Keep a short log of times for your model — that information saves guesswork on future recipes.
| Temp | Minutes | Flip | Visual Cue |
|---|---|---|---|
| 370°F | 8–9 | Midway | Fast edge color on thin slices |
| 375°F | 10–15 | Halfway | Deep gold, tender center |
| 390°F | 9–10 | Once | Rapid browning, firm crust |
My Secret Techniques for Next-Level Crunch
I treat water like an opponent: remove it, and you win a pleasant, audible crunch. I press blocks at least 30 minutes, then pat with paper towels to remove excess moisture.
When I have time, I use a quick freeze-thaw. That opens tiny pockets so marinades sink deeper and the texture improves.
Airflow and Spacing
Space pieces so hot air can sweep every side. I make sure there’s a true single layer in the air fryer basket or fryer basket.
If they touch, they steam, and the outer shell softens. I work in batches rather than stacking to keep color and bite consistent.
Light oil, Mist, and Cornstarch Jacket
A feather-light oil spray plus a thin cornstarch coat builds a glassy shell. I whisk cornstarch with a splash of soy or water first to avoid clumps.
If moisture beads on the surface, I blot again before cooking. Midway, I rotate or shuffle positions in the basket to even out hot spots.
- I press to remove water, pat with paper, or freeze-thaw for better absorption.
- Single layer and spacing prevent steaming and preserve texture.
- Light oil and a cornstarch slurry give a lasting, glossy crust.
| Technique | Why it Helps | When to Use |
|---|---|---|
| Press & pat | Removes surface water so heat browns quickly | Always, 30+ minutes press recommended |
| Freeze-thaw | Creates pockets for marinades and a firmer bite | Planned prep night before cooking |
| Space in the basket | Maximizes airflow; prevents steaming | Cook in a single layer; batch if needed |
| Oil mist + cornstarch slurry | Forms a thin, glassy shell that resists sogginess | Before cooking, blot if surface beads |
If you want variations on technique for other proteins, see my guide on how I cook ground beef in an air for related setup tips.
Flavor Profiles You’ll Crave: Sauces, Marinades, And Glazes
A smart glaze makes every bite taste like it was worth the wait. I build three go-to profiles that fit weeknight rhythms and weekend tastes.
Smoky Maple-Soy with Paprika and Garlic
Whisk 2 tbsp maple, 1 tbsp soy sauce, 1 tsp smoked paprika, 1/4 tsp garlic powder, and a pinch of pepper. Add a drop of liquid smoke for depth.
Sticky Hoisin Glaze with Sesame Oil and Rice Vinegar
Thin 2 tbsp hoisin with 1 tsp rice vinegar and 1/2 tsp toasted sesame oil. Toss hot pieces in this bowl right after cooking so the glaze clings and shines.
Spicy or Tangy Spins: Sriracha, Peppercorn, or Citrus
Stir 1 tsp sriracha into a base of soy and a squeeze of citrus. Or add crushed pepper and grated ginger to brighten sugar-forward mixes.
- I keep sugar minimal so sauces caramelize, not burn.
- Build sauces in a small bowl while proteins cook; toss in a minute for full coverage.
- Swap maple for brown sugar, use avocado oil in marinades, or trade soy sauce for tamari in gluten-free recipes.
| Profile | Key Ingredients | Finish |
|---|---|---|
| Smoky Maple | Maple, soy sauce, paprika | Warm, savory-sweet |
| Hoisin Gloss | Hoisin, rice vinegar, sesame oil | Shiny, balanced |
| Spicy-Tang | Sriracha, citrus, pepper | Bright, lively |
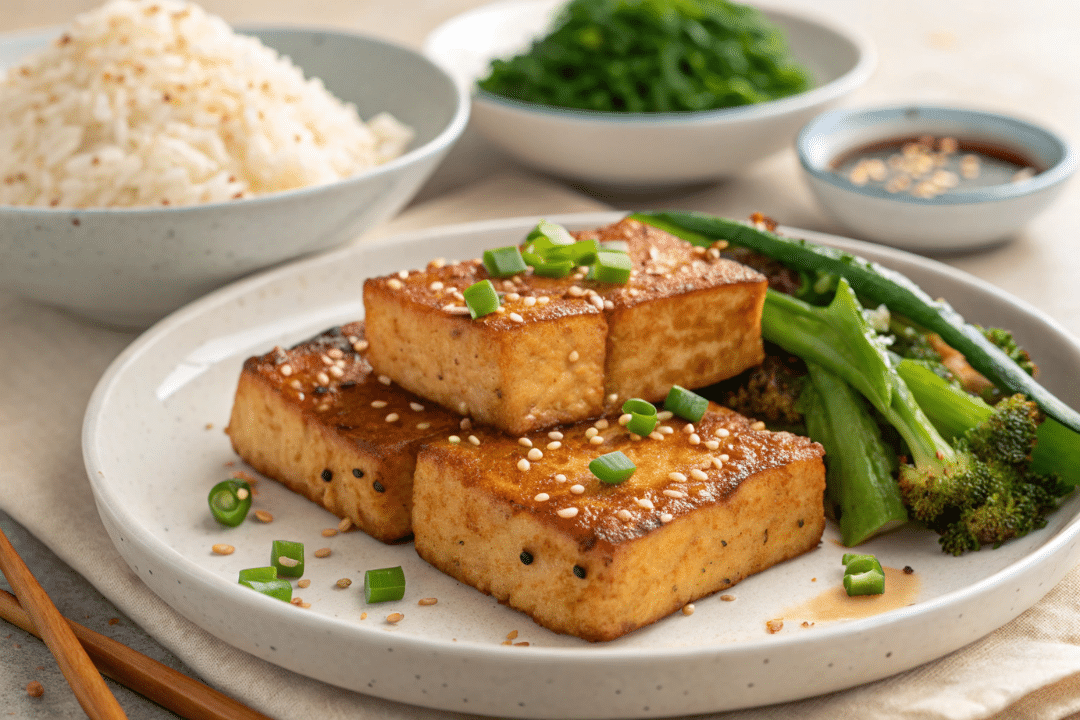
Serving Ideas that Make it a Meal
A quick bowl turns weeknight cooking into something I actually look forward to eating. Build plates that balance warm rice, bright veg, and a bold finish. Little contrasts—soft and crunchy, hot and cool—make every forkful interesting.
Bowls: Rice, Green Beans, and Scallion-Sesame Garnish
I slice the cooked pieces into thick strips and layer them over warm rice with garlicky green beans. I scatter sesame seeds and curl scallions for texture and aroma.
A few avocado slices add creamy balance. If I want more protein, I toss in edamame or a handful of roasted peanuts.
Weeknight Upgrades: Stir-Fry Veggies, Salads, or Noodle Bowls
For crunch on crunch, I use shaved cabbage and cucumber with a sesame-lime dressing. Noodle night? Toss rice noodles in a light soy-vinegar dressing, then crown with the strips so heat wilts herbs slightly.
Leftover sauce thins into an instant dressing—just add a splash of water and taste. Keep colors varied: greens, golds, and a pop of red chili for contrast and visual appeal.
| Style | Key Components | Why it Works |
|---|---|---|
| Rice bowl | Rice, green beans, scallions | Comforting base, steady heat |
| Noodle bowl | Rice noodles, herbs, light dressing | Slurpy, fresh, quick |
| Salad bowl | Shaved cabbage, cucumber, avocado | Crunchy, cooling contrast |
Leftovers Done Right: Storage and Easy Reheating
Treat storage as part of the recipe; do it right, and you win every time.
I cool the pieces to room temperature before sealing. Then I place them in an airtight container so steam won’t soften the crust. Label the container with the date for easy tracking.
In the refrigerator, the leftover keeps well for 3–5 days. For longer storage, I wrap pieces individually and freeze them tightly for 1–2 months. Thaw overnight in the fridge before reheating.
To re-crisp, I use an air fryer set to 350–375°F for 3–5 minutes. No extra oil is needed unless the surface looks dry; a light mist brings it back. Spread pieces apart in the basket so hot air circulates and edges firm up.
If a piece is heavily sauced, I reheat slightly lower and for a few extra minutes so the glaze warms without scorching. I add a teaspoon of sauce after reheating to preserve texture and flavor.
| Storage Method | Duration | Reheat |
|---|---|---|
| Airtight container, fridge | 3–5 days | 350–375°F, 3–5 minutes |
| Individually wrapped, freezer | 1–2 months | Thaw overnight; reheat as above |
| Heavily sauced pieces | 3–5 days | Lower temp, longer minutes; sauce after reheating |
Nutrition Notes and Smart Substitutions
A few mindful choices turn this recipe into a meal that fits many diets and goals. I keep guidance short and useful so you can swap with confidence and keep great taste.
Gluten-Free and Lower-Sodium Swaps
For gluten-free cooking, I replace soy sauce with tamari or coconut aminos. Coconut aminos are slightly sweeter and often lower in salt.
Oil and Sodium Choices
I choose avocado oil for high-heat stability and a clean finish. Use low-sodium soy when you want the savory base without the extra salt. Add a splash of rice vinegar or citrus to lift flavor instead of adding more salt.
- Extra-firm tofu and high-protein styles hold shape, contain less water, and crisp faster.
- If you’re cutting oil, use a very light spray and finish with a bold sauce so the dish still tastes full.
- Taste sauces and dilute with water or vinegar if the salt level is too strong.
- Reheat at 375°F for about 4–5 minutes in the air fryer to revive texture.
| Need | Swap | Why it helps |
|---|---|---|
| Gluten-free | Tamari or coconut aminos | Keeps savory notes without gluten |
| Lower sodium | Low-sodium soy | Reduces salt; add acid to brighten |
| High-heat oil | Avocado oil | Stable at fry temps; neutral taste |
I keep ingredients simple: aromatics, a salty base, a little sweetness, and heat to taste. This information and these tips help you adapt recipes without losing the texture or the flavor you came for.
Conclusion
Finish strong: the method matters more than miracle ingredients.
I press at least 30 minutes, then preheat and air fry at 375–390°F for about 9–15 minutes, flipping once halfway. These exact minutes help the crust set and the center stay firm.
Make sure to remove excess moisture with a paper towel and use firm tofu or high-protein blocks for structure. Keep seasoning simple—soy, garlic, and pepper—and sauce after frying so sugars don’t burn.
Store leftovers 3–5 days and reheat at 350–375°F for a few minutes to revive texture. Save this recipe as a baseline, riff on the flavors, and make dinner that crackles. Ready to cook? Preheat the air fryer, grab your block, and let’s fry.

Crispy Air Fryer Tofu Steaks
Ingredients
Method
- Press tofu for at least 30 minutes, then pat dry thoroughly with paper towels.
- Slice tofu into ¾–1-inch thick steaks for a firm, meaty texture.
- Toss tofu with soy sauce, maple syrup, spices, oil, and optional cornstarch until evenly coated.
- Preheat the air fryer to 375°F and lightly spray the basket with oil.
- Arrange tofu steaks in a single layer, leaving space for airflow.
- Air fry for 10–15 minutes, flipping halfway, until golden and crisp on both sides.
- Remove from the air fryer and brush or toss with sauce while hot.
- Rest for 1 minute before serving to allow the crust to set.
Notes
FAQ
What kind of tofu should I buy for the best texture?
Do I need a tofu press, or will paper towels work?
How long should I press the tofu?
Should I freeze tofu first to improve texture?
Do I need to coat the tofu with cornstarch?
How should I season the tofu before cooking?
What temperature and time do you recommend for air frying?
Do I need to flip the pieces while cooking?
Can I brush sauce on during cooking or only after?
How do I avoid overcrowding the fryer basket?
What oil should I use for misting?
How do I store leftovers and reheat them?
Any gluten-free or low-sodium swaps?
What are some sauce ideas to pair with these steaks?
How can I tell when the pieces are perfectly golden?
Can I make these ahead for a meal prep bowl?
About The Author
John
John Watson is the passionate food enthusiast behind MePlusFood.com. With a deep love for exploring culinary delights, he shares honest restaurant reviews, mouthwatering recipes, and culinary adventures. Join John on his flavorful journey to savor the world one bite at a time.